Battery switch on travel trailer function is crucial for managing your RV’s power. Understanding how to use your battery switch safely and effectively is key to enjoying worry-free adventures. This guide covers different switch types, connection procedures, troubleshooting tips, and essential maintenance practices, ensuring you’re prepared for any situation on the road. We’ll explore everything from basic operation to advanced troubleshooting, empowering you to become a confident RV owner.
This guide breaks down the complexities of your travel trailer’s battery system into easily digestible steps. We’ll cover the different types of battery switches available, explaining their functions and how to use them properly. We’ll also provide safety guidelines and troubleshooting advice, helping you to prevent common problems and keep your power running smoothly.
Understanding Battery Switches in Travel Trailers
Your travel trailer’s battery system is crucial for powering lights, appliances, and other conveniences while off-grid. Understanding how your battery switch works is key to maximizing your power and preventing problems. This section will explain the different types of battery switches, their purposes, and how to use them safely and effectively.
Types of Battery Switches
Travel trailers typically utilize one of three main types of battery switches: simple on/off switches, two-battery switches, and battery isolators. Each offers different levels of control and functionality.
Simple On/Off Switches
These are the most basic type, simply turning the battery power on or off. They’re usually found in older models or as a supplementary switch for a single battery. Their primary purpose is to provide a means of completely disconnecting the battery from the trailer’s electrical system. This is important for safety when the trailer is stored for extended periods or undergoing maintenance.
Using it is straightforward: flip the switch to the “on” position to activate the battery, and to the “off” position to disconnect it.
Two-Battery Switches
These switches allow you to select between two batteries (typically a house battery and a starting battery). This is common in trailers with separate batteries for house power and engine starting. The purpose is to manage power independently, ensuring you don’t drain your starting battery while using house appliances. To use it, simply select the desired battery source using the switch.
This often involves positions for “Both,” “House,” “Start,” and “Off.” “Both” connects both batteries, typically for charging or high-power needs; “House” connects only the house battery; “Start” connects only the starting battery; and “Off” disconnects both.
Battery Isolators
These are more sophisticated devices that automatically manage power between the batteries. Their main purpose is to prevent the starting battery from being drained by the house battery while the engine isn’t running, and to charge both batteries simultaneously when the engine is running. Many modern trailers utilize this type of system because of its convenience and automatic protection.
You typically don’t actively switch an isolator; it operates automatically based on the charging voltage from the alternator. However, some isolators have manual override switches for added control.
Comparing Battery Switch Types
| Feature | Simple On/Off | Two-Battery Switch | Battery Isolator |
|---|---|---|---|
| Number of Batteries Controlled | One | Two | Two (automatic) |
| Control Type | Manual On/Off | Manual Selection | Automatic with potential manual override |
| Complexity | Low | Medium | High |
| Cost | Low | Medium | High |
Proper Battery Switch Usage
Always consult your trailer’s owner’s manual for specific instructions regarding your battery switch. However, here are some general guidelines:
- Before using the trailer: Ensure the switch is in the correct position for your intended use (e.g., “Both” if you need maximum power, “House” for typical use).
- During use: Monitor your battery levels to prevent deep discharge.
- After use: Turn off unnecessary appliances and consider switching to the “Off” position if the trailer will be unused for an extended period to prevent parasitic drain.
- Maintenance: Periodically inspect your battery switch and connections for corrosion or damage.
Connecting and Disconnecting Batteries
Using your travel trailer’s battery switch is a straightforward process, but safety and proper technique are crucial for preventing damage to your batteries and avoiding potential hazards. This section Artikels the steps involved and emphasizes important safety precautions.Connecting and disconnecting your RV batteries using a battery switch is a simple process once you understand the steps and safety measures involved.
The switch typically has positions for “Both,” “Off,” and “Start” (sometimes labeled “House”). The “Both” position connects both your house and starting batteries, the “Off” position disconnects both, and the “Start” position only connects the starting battery, usually for engine cranking.
Battery Switch Operation
To connect your batteries, simply turn the switch to the desired position (“Both” for all systems or “Start” for engine cranking only). To disconnect, turn the switch to the “Off” position. Before making any changes, ensure the switch is clearly labeled to avoid confusion. Some switches have a locking mechanism; refer to your specific switch’s instructions if this is the case.
Remember to always turn the switch to “Off” before performing any maintenance on the battery system.
Safety Precautions When Working with RV Batteries
Working with lead-acid batteries presents certain risks. Always wear appropriate safety glasses and gloves to protect yourself from potential acid splashes or corrosion. Batteries generate hydrogen gas, which is highly flammable. Ensure adequate ventilation in your battery compartment to prevent gas buildup. Never use open flames or sparks near batteries.
So, you’re getting ready for a road trip in your travel trailer? Awesome! First things first: make sure you understand the battery switch on travel trailer function – it’s crucial for managing your power. Once you’ve got that sorted, think about your entertainment. Setting up an amazing audiophile travel aetup will make those long drives way more enjoyable.
Properly managing your power and having great sound are key for a comfortable and fun trip!
If you detect any unusual odors (like rotten eggs), immediately ventilate the area and consult a professional. Additionally, be mindful of the weight of the batteries; lifting heavy batteries alone can lead to injury, so always ask for help if needed.
Battery Maintenance for Extended Lifespan
Proper maintenance significantly extends the lifespan of your RV batteries. Regularly inspect the battery terminals for corrosion. Clean them using a wire brush and baking soda solution. Keep the battery compartment clean and dry. Check the electrolyte levels (if applicable, for flooded lead-acid batteries) and add distilled water if necessary, ensuring the levels are within the recommended range.
Avoid completely discharging your batteries, as this can shorten their lifespan. Consider using a battery maintainer when your RV is stored for extended periods. A regular deep cycle charging routine will also help maintain battery health.
Pre- and Post-Switch Use Inspection Checklist
Before using the battery switch:
- Verify the switch is in the “Off” position.
- Inspect battery terminals for corrosion.
- Check the battery compartment for any signs of damage or leaks.
- Ensure adequate ventilation.
After using the battery switch:
- Confirm the switch is in the correct position (Off if not in use).
- Visually inspect the battery terminals for any signs of damage or corrosion.
- Check for any unusual smells (hydrogen gas or acid).
Troubleshooting Common Battery Switch Issues
Your travel trailer’s battery switch is a critical component, ensuring power flows correctly to your appliances and systems. When it malfunctions, it can leave you stranded without power. Understanding common problems and troubleshooting steps will help you quickly restore functionality and avoid frustrating breakdowns.
Common Battery Switch Problems
Several issues can prevent your battery switch from working properly. These range from simple problems easily solved with basic tools, to more complex issues requiring professional assistance. Identifying the specific problem is the first step to resolving it. The most frequent problems include blown fuses, corroded connections, faulty switches, and wiring problems. Each of these requires a different approach to troubleshooting.
Troubleshooting Steps for a Non-Functional Battery Switch
Before starting any troubleshooting, always disconnect the negative terminal of your battery to prevent electrical shocks. Safety first! A systematic approach will help you pinpoint the problem. Begin by visually inspecting the switch itself for any obvious damage. Check for loose connections, burnt wires, or signs of corrosion. Then, test the fuses associated with the battery switch.
If a fuse is blown, replace it with one of the same amperage rating. If the fuse blows again immediately, there’s a short circuit somewhere in the wiring that needs to be addressed. If fuses are fine, check the battery connections for corrosion or looseness. Clean any corrosion with a wire brush and tighten loose connections. If the problem persists after these checks, the switch itself may be faulty and require replacement.
If you are uncomfortable working with electrical systems, consult a qualified RV technician.
Resolving Blown Fuses and Corroded Connections, Battery switch on travel trailer function
A blown fuse indicates an overload in the circuit. Replacing the fuse without addressing the underlying cause will likely lead to another blown fuse. Before replacing the fuse, thoroughly inspect all wiring connected to the circuit for any shorts or damaged wires. Look for bare wires touching each other or metal parts of the trailer. Repair or replace any damaged wiring before replacing the fuse.
Corrosion on battery terminals and connections restricts current flow and can lead to poor performance or even complete failure. Clean the terminals and connections using a wire brush and baking soda solution. Apply a corrosion inhibitor to prevent future corrosion. Tighten all connections securely. Remember to always disconnect the negative battery terminal before working on any electrical components.
Troubleshooting Flowchart
Imagine a flowchart. It would start with a question: “Is the battery switch turned on?”. If yes, the next step would be “Check the fuses”. If a fuse is blown, replace it and then check for shorts in the wiring. If no fuse is blown, the next step would be “Inspect battery connections for corrosion”.
Clean and tighten if necessary. If the problem persists after these steps, the next step would be “Check for loose or damaged wiring”. Repair or replace as needed. If the issue still exists, the final step would be “The switch may be faulty – replace it or consult a professional”. This flowchart provides a clear, step-by-step guide to effectively troubleshooting common battery switch issues.
Battery Switch and Electrical System Integration
Your travel trailer’s battery switch acts as the central control for your DC power system, connecting and disconnecting your house batteries from the rest of the electrical components. Understanding its role is crucial for safe and efficient power management. It’s the gatekeeper determining which parts of your trailer receive power from your batteries.The battery switch’s primary function is to manage power distribution from your house batteries.
When the switch is “ON,” it completes the circuit, allowing power to flow from the batteries to various appliances and systems within your trailer, such as lights, water pumps, and refrigerators. Conversely, when the switch is “OFF,” it breaks the circuit, preventing power from reaching these components and thus preventing battery drain when the trailer is not in use.
This simple action protects your batteries from depletion and prevents accidental discharge.
Power Distribution Management
The battery switch is usually positioned in a readily accessible location, often near the battery compartment. Its configuration varies depending on the trailer’s setup, but typically involves a simple switch with positions for “OFF,” “BATTERY,” and sometimes “BATTERY & SHORES.” The “BATTERY” position connects the house batteries directly to the trailer’s 12V system. The “BATTERY & SHORES” position (if present) connects both the house batteries and shore power to the system, allowing for simultaneous charging of the house batteries while also powering the trailer’s appliances.
The “OFF” position completely isolates the batteries from the rest of the system. This isolation prevents accidental discharge and is vital for long-term storage.
Impact of a Faulty Battery Switch
A malfunctioning battery switch can have several negative consequences. If the switch is stuck in the “ON” position, your house batteries could be drained completely even when the trailer is not in use. This can lead to a dead battery and leave you stranded without power. Conversely, if the switch is stuck in the “OFF” position, you’ll have no power from your house batteries, rendering many of your trailer’s essential systems inoperable.
This can be problematic when you’re boondocking (off-grid camping) and relying solely on your house batteries. A faulty switch might also create intermittent power issues, leading to erratic operation of appliances and potentially damage to sensitive electronics.
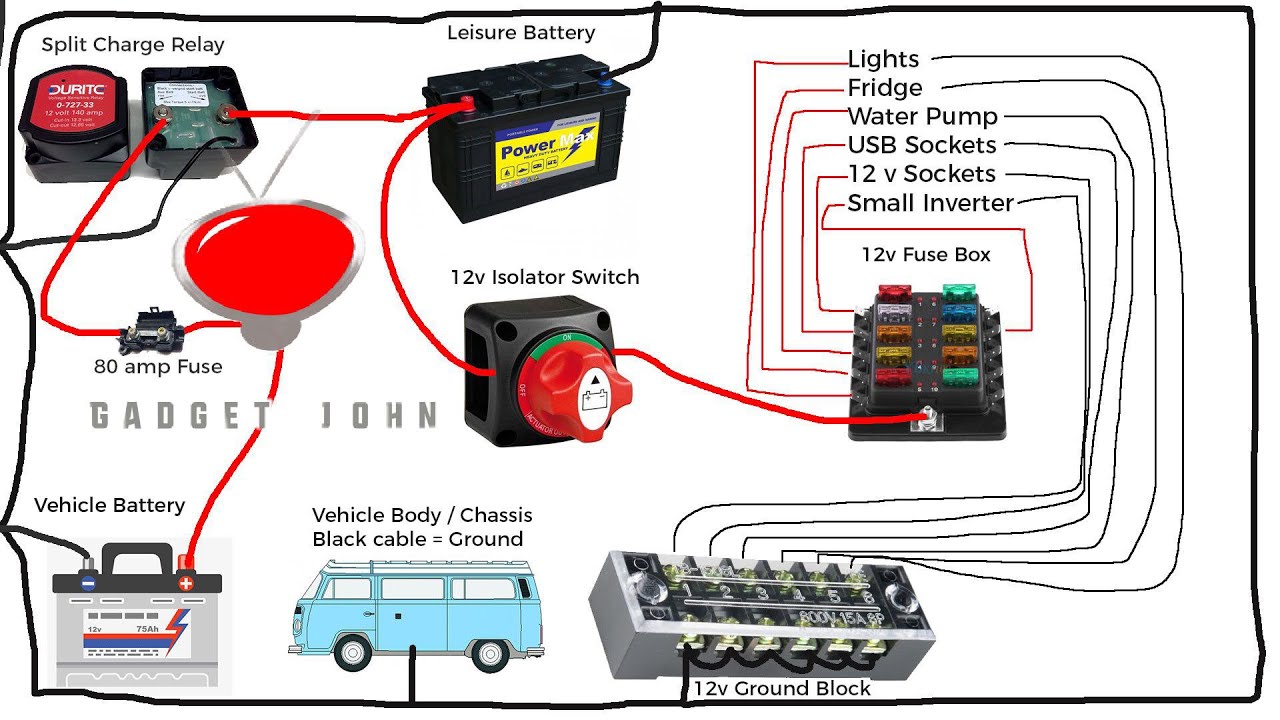
Electrical System Diagram
 The diagram depicts a simplified representation of the system. On the left, we see the house batteries. In the center is the battery switch, shown in both the ON and OFF positions in separate diagrams. On the right are the various appliances and systems in the travel trailer. Arrows illustrate the flow of electricity when the switch is engaged (ON), and the lack of flow when the switch is disengaged (OFF).
This visual helps to understand how the battery switch controls the power distribution within the travel trailer.
So, you’re prepping for a road trip? Awesome! First things first: make sure your travel trailer’s power is sorted. Check out this guide on the battery switch on travel trailer function to avoid any dead-battery surprises. Once that’s handled, you can focus on the fun stuff, like setting up your awesome audio. If you’re an audiophile, a killer audiophile travel setup is a must-have for those epic road trip playlists.
Get those tunes cranked!
Battery Switch Maintenance and Replacement
Keeping your travel trailer’s battery switch in top condition is crucial for reliable power and preventing costly repairs. Regular maintenance and timely replacement of a faulty switch are key to ensuring a smooth and safe camping experience. Neglecting this simple yet vital component can lead to significant problems down the road.Preventative Maintenance Schedule for Travel Trailer Battery SwitchesRegular inspection and cleaning of your battery switch are essential preventative measures.
A simple visual check during each pre-trip inspection can identify potential issues early on. This includes looking for corrosion, loose connections, or any signs of damage.
Preventative Maintenance Schedule
A good preventative maintenance schedule should include:
- Monthly Inspection: Visually inspect the switch for corrosion, loose connections, or damage. Clean any corrosion with a wire brush and baking soda solution.
- Semi-Annual Cleaning: Thoroughly clean the switch and its connections with a wire brush and a battery terminal cleaner. Apply a dielectric grease to protect against corrosion.
- Annual Inspection and Testing: Perform a more thorough inspection, including checking the switch’s functionality and ensuring all connections are secure. Consider having a qualified technician inspect the switch if you’re unsure.
Safely Replacing a Faulty Battery Switch
Replacing a battery switch requires careful attention to safety procedures to avoid electrical shocks or short circuits. Before starting any work, always disconnect the negative battery terminal. This will prevent accidental electrical contact.
Tools and Materials Needed for Battery Switch Replacement
To replace your battery switch, you will need the following tools and materials:
- New battery switch (ensure it’s the correct amperage and type for your system)
- Wrench or socket set (sizes appropriate for your battery terminals and switch mounting hardware)
- Wire cutters/strippers
- Screwdrivers (Phillips and flathead, as needed)
- Electrical tape
- Dielectric grease
- Wire brush
- Safety glasses
- Work gloves
Consequences of Neglecting Battery Switch Maintenance
Ignoring battery switch maintenance can lead to several serious problems. Corrosion can build up on the switch’s terminals, creating a high-resistance connection and reducing power flow to your appliances. In severe cases, this can lead to overheating, melting wires, and even fires. A malfunctioning switch can also cause unpredictable power outages, leaving you stranded without lights or other essential systems.
Furthermore, a poorly maintained switch may fail completely, leaving you unable to use your batteries, resulting in a dead battery and the inconvenience of replacing it prematurely. In extreme cases, neglecting maintenance could lead to damage to other electrical components in your travel trailer, requiring extensive and costly repairs.
Different Battery Switch Configurations
Choosing the right battery switch for your travel trailer is crucial for managing power effectively and preventing issues. The type of switch you need depends largely on your power needs and the number of batteries you’re using. Let’s explore the common configurations.
Different battery switch configurations offer varying levels of control and flexibility over your RV’s power sources. Understanding the pros and cons of each type will help you make an informed decision for your specific needs.
Single Battery Switch Configurations
A single battery switch is the simplest setup. It’s typically used in travel trailers with a single 12-volt battery for powering the house systems. This switch simply connects or disconnects the battery from the trailer’s electrical system. The advantage is its simplicity and low cost. However, the disadvantage is a lack of flexibility; you can’t isolate specific circuits or charge batteries independently.
It’s suitable only for basic setups with minimal power demands.
Dual Battery Switch Configurations
Dual battery switches allow you to manage two batteries independently. This is common in setups with a house battery and a starting battery for the tow vehicle. With a dual switch, you can: (1) connect both batteries together to power the trailer; (2) isolate the house battery while still using the starting battery to start the vehicle; or (3) isolate both batteries completely.
The advantages include increased runtime and the ability to charge each battery separately. The disadvantage is that it’s still a relatively simple setup and doesn’t offer the granular control of more advanced systems. This configuration is ideal for trailers that need extended off-grid power and have a dedicated starting battery.
Three-Way Battery Switch Configurations
Three-way switches are more sophisticated, offering more control over multiple batteries and circuits. They usually manage one starting battery and two house batteries. This allows for various combinations, such as running off one house battery while charging the other, or combining both house batteries for maximum power. This configuration provides excellent flexibility and maximizes battery life. However, it’s more complex to install and understand, and it is more expensive than simpler switches.
This setup is best for larger travel trailers with high power demands or those who frequently boondock (camp without hookups).
Comparison of Battery Switch Configurations
The following table summarizes the key differences between the various battery switch setups.
| Feature | Single Battery Switch | Dual Battery Switch | Three-Way Battery Switch |
|---|---|---|---|
| Number of Batteries Managed | One | Two | Three (typically one starting, two house) |
| Flexibility | Low | Medium | High |
| Cost | Low | Medium | High |
| Complexity | Low | Medium | High |
| Ideal Setup | Basic trailers with minimal power needs | Trailers with a house and starting battery | Large trailers with high power demands or frequent boondocking |
Safety Considerations When Using a Battery Switch: Battery Switch On Travel Trailer Function

Working with RV batteries and their associated electrical systems presents several potential hazards. Improper use of a battery switch can lead to serious injury or damage to your RV’s electrical components. Understanding and following safety guidelines is crucial to prevent accidents.
Potential Hazards of Improper Battery Switch Usage
Incorrectly operating the battery switch can result in accidental short circuits, sparking, and even explosions. Connecting or disconnecting batteries while the system is energized can cause significant arcing and potential burns. Furthermore, ignoring proper safety procedures can lead to damage to the battery switch itself, the wiring, or other electrical components in your RV. This can result in costly repairs and potentially leave you stranded.
Failing to disconnect batteries during maintenance or repairs significantly increases the risk of electric shock.
Safety Guidelines for Working with RV Batteries and Electrical Systems
Before working with your RV’s electrical system, always disconnect the negative (-) battery terminal first. This is a standard safety procedure that helps prevent accidental short circuits. When reconnecting, attach the negative terminal last. Always wear appropriate safety glasses to protect your eyes from potential sparks or acid splashes. Make sure the area is well-ventilated to avoid inhaling potentially harmful battery gases.
Never work on the electrical system in wet or damp conditions, as this significantly increases the risk of electric shock. If you are unsure about any aspect of the procedure, consult a qualified RV technician.
Importance of Personal Protective Equipment (PPE)
Personal Protective Equipment (PPE) is essential when working with RV batteries and electrical systems. At a minimum, this includes safety glasses to protect your eyes from sparks and battery acid splashes. Rubber gloves are crucial to protect your hands from corrosive battery acid and to prevent electric shock. Consider using a respirator or dust mask to avoid inhaling harmful battery gases, especially when working in enclosed spaces.
Insulated tools should be used to avoid electric shock when working with electrical components. For extensive electrical work, a face shield provides additional protection against splashes and sparks.
Safety Poster Design
The safety poster would feature a bold, easily readable title: “RV Battery Safety: Protect Yourself!” The poster would be visually striking, using a combination of bright colors and clear graphics. A large central image would depict a person wearing appropriate PPE (safety glasses, rubber gloves) while safely disconnecting a battery terminal. Smaller images would illustrate key safety points: a crossed-out image of someone working on a live system, an image of a well-ventilated area, an image of properly stored batteries, and an image showing the correct order of connecting/disconnecting battery terminals (negative last).
The poster would include clear, concise bullet points outlining each safety precaution, using simple language and avoiding technical jargon. A contact number for a qualified RV technician would be included at the bottom for emergencies or if assistance is needed. The overall tone would be cautionary but reassuring, emphasizing the importance of safety for preventing accidents and injuries.
Mastering your travel trailer’s battery switch is about more than just turning power on and off; it’s about understanding your RV’s electrical system and ensuring safe, reliable operation. By following the tips and advice in this guide, you’ll be well-equipped to handle any battery-related issues that may arise, keeping your adventures powered and your peace of mind intact. Remember regular maintenance and safe practices are key to a long and happy RV life!
General Inquiries
What happens if I leave my battery switch on all the time?
Leaving your battery switch on constantly can drain your batteries, especially if you have parasitic draws (small electrical loads even when the trailer isn’t in use). This can lead to dead batteries and potentially damage your electrical system.
How do I know which type of battery switch I have?
Check the switch itself for markings indicating the type and amperage rating. You can also consult your RV’s owner’s manual for details on the electrical system and battery switch.
My battery switch is stuck. What should I do?
Try using a penetrating lubricant like WD-40 on the switch mechanism. If it’s still stuck, you might need to replace the switch. Consult a qualified RV technician if you’re unsure.
How often should I check my battery connections?
Inspect your battery connections at least once a month for corrosion and tightness. Clean any corrosion with a wire brush and baking soda solution.
